Neon Beanie

I love me some Madelinetosh. The colors are just… breath taking. They make me so happy, even the darkest ones. This is only my third skein of Madelinetosh, but it is worth the price tag. This is the ToshMerinoLight, fluffy, soft, and just so lovely.

DSC_0105

I used the Basic Beanie pattern, and just carried on a bit with it.

DSC_0107 IMG_7574 DSC_0108

Knitted Advent Calendar

I love Christmas. The love, the family, the hot coco, the eggnog, the snow, the everything. Last year I made Christmas Stockings for the family, which we used again this year.1530360_10201239358526453_1411832804_n_medium2

This year I took the next step to make an advent calendar! I used the same yarn as the stockings. I made tiny mittens, and socks in red, white, and green with a multicolored gift to represent the 25th.

I then made the chain with a single crocheted chain and strung them along after crocheting numbers on each.

IMG_6877 IMG_6888 IMG_7111 IMG_7120 IMG_7114 IMG_7113 IMG_6871

Erin Condren Teacher Lesson Planner Review

I’m going to begin student teaching so soon! I also love planners! I also am concerned about lesson planning, and doing my very best. Through a friend of mine, I decided to look into Erin Condren’s planners, and I loved it so much that I ordered one of them!

A lovely floral cover. I just put my name on it as I do not know where I will be teaching.

A lovely floral cover. I just put my name on it as I do not know where I will be teaching.

Here’s a few of the issues I already have with it. Firstly, the front cover, it is spiral bound and the cover is a hearty plastic. But it already had some noticeable scratches on it. Also there was a bit where the plastic was not threaded through the spiral. I remedied this by cutting these tiny bits and pushing the tabs back in.

DSC_0105

Tabs needed to be cut. Otherwise they were sitting over the rings.

I have some issues with how the tabs work in the planner as well. Firstly that some of the tabs directly overlap, and others seem to be missing. I created a table to try and show what I’m talking about:

Screen Shot 2015-01-02 at 2.31.08 PM

DSC_0107

Two tab spaces with nothing in them, why doesn’t June directly follow July?

DSC_0109

Lilac Year Plan tab directly on top of Mint February tab.

DSC_0108

Green December tab directly on top of Red Lessons tab.


While these are not huge issues the planner was quite expensive and I do not understand the logic of the tabs being organized in this way.

I have not began teaching yet, so I have not filled anything out but I am excited to see how it goes!

I intend on coming back to this post sporadically and updating it.

I never sew, but when I do, I make Quidditch Uniforms.

1464634_10202970241437444_5863034208161998706_n

So people asked me to put together a tutorial of how I made my quidditch uniform. I want to preface this a few comments. 


1. This was for self enjoyment. I made it to make myself happy, no intentions to sell/replicate it so I apologize for any parts you find confusing. 

2. I don’t sew. I’m a knitter by trade so I’m comfortable with making things, but not fabric. So the way I did things may not make sense. I have NEVER made a garment before. Ever. Not even a pillowcase. 

3. I really encourage anyone who makes this to go with your intuition. Change it! Add to it! Make it your own. 


Supplies:

  • 3 yards of main color (yellow)
  • 1 yard of contrasting color (black)
  • 1 roll of thick ribbon (black)
  • Pins
  • Sewing machine
  • Needles 
  • Thread (both in black and yellow)

Measurements: I’m 5’5 around 150 lbs for sizing help. I tend to wear a medium in everything. 

I over bought the fabric. I was scared I wouldn’t have enough. In the end I was left with a few scraps.

Although it was not my intention the yellow fabric was held double. You could see the black through the yellow a bit, and I didn’t want that. Although having the two layers of fabric may have made it more sturdy. ( when doing any of the other houses you probably won’t face the same problem as the secondary colors are lighter)

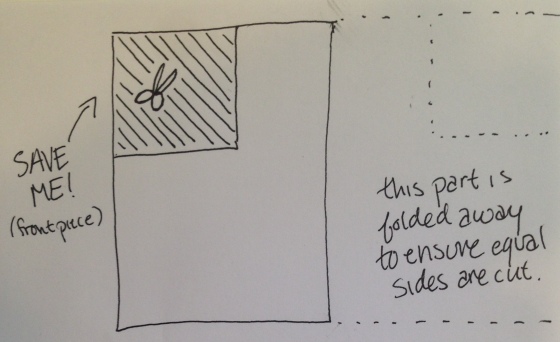
My first step was to fold the yellow in half. Then quarters. This ensured that both halves of the garment would be equal. 

IMG_6841

I measured my torso (I have a weirdly long torso!) then marked it off on the fabric. Then cut the square out.

Basically you cut one corner out of the non-folded side. This part will become the front of the shirt. SO SAVE IT.

IMG_6838

Then you open it up, still with the yellow layered. Lay the black over the bottom, large rectangle. Hem all of the edges together.

IMG_6840

Then cut a slit down the center and hem off those edges.

Then place the front piece on top, and sew the shoulders up.

IMG_6839

Now it is like a smock! So at this point I sewed D-rings on the front and back and clipped them together on either side.

IMG_6842 

The finishing pieces were all hand sewn on, the number, the “pocket”. The letters were iron on letters from the store.

Screen Shot 2014-11-13 at 12.44.52 PM

AGAIN, I’m not a seamstress, so this isn’t going to be super clear, but it is the best I could do.

Completed Shawl

I did not ever think that I would be one of those people who could make lacy shawls. I just did not see it as part of my knitting arsenal. But the blooming after its completion was just amazing. This pattern, Ashton Shawl by Dee O’Keefe is just phenomenal. All the steps are so explicitly clear and lovely.

As I type this I am getting ready to go to my LYS, Gather Here, to get more yarn, to start another one again.

DSC_0003_medium2 DSC_0003 DSC_0005 DSC_0007 DSC_0011 image_medium2-1 image_medium2-2 image_medium2

Lacy Shawl Say Whattttt? Complicated.

Full disclaimer: this is the first time I have ever tried to make a lacy shawl thing. Well at this point third, since I have frogged it twice. But only due to my inattention. This pattern came from the beginner gods.

I am working on the Ashton Shawlette, and it is the longest pdf I have ever had for a pattern. It is so careful and detailed and somehow not at all overbearing. It is available for free on ravelry so I suggest you go take a look!

I am using Cascade Yarns Heritage Silk, in Teal, it is just perfect, I really love it.

DSC_0004 DSC_0006

Cabled Sweater, Part II

So I have completed the bodice of the sweater. Again, still without the ribbing on the bottom. My mother is concerned about how small it is, but it is mostly cables on the front and back. I only recently learned that cables are basically really fancy ribbing. Which makes sense if one thinks about it.

IMG_8177.JPG

IMG_8180.JPG

IMG_8184.JPG

So I’ve set it aside, I have not yet decided whether to add another repeat of the cable pattern so I left it on the needles, with the yarn still attached.

I’ve started on the sleeves now. I do not know why but I decided to add a single 4 stitch cable up the sleeve. It’s going to mimic the cables going up the sides on the bodice of the sweater.

DSC_0014

Cabled Sweater, Part I

So I have never really made a serious sweater. I made one once in super bulky, I just wanted to learn the basics, and it was perfect for that. Now though I want to step it up a notch. It doesn’t help that every time I wear a knit sweater someone asks me if I have knit it, and I haven’t, so this way people can ask and I can say yes!

I am loving this pattern though, its so clear. It’s the Jess’ Birthday Sweater, and although the PDF is simple it is perfect.

I have just arrived at the waist shaping part. I have found it helps to mark on the cable pattern where the decreases are happening.

DSC_0231 copyDSC_0242 DSC_0245

Baby Camel Vest

I have some friends who are pregnant! I’m so excited for them. They do not yet know if it is a boy or a girl, so I went with a nice grey. They also have a ceramic camel that they have had for a while, that was even present at their wedding. It seems like it makes sense to make them a little camel themed jumper.

I went with the Magic Troll Vest, which I have made in the past. Very clear instructions, and it knits up so quickly, perfect for a forgotten baby shower.

I used Swans Island Organic Washable DK, in two different grays, graphite and pewter, with size 5, 16-inch circulars.

I augmented the pattern a bit to fit my needs. I used this website to create the stitch pattern, and then knit the vest separately. First I knit the front panel, then the back panel, then ribbed and knit the shoulder straps, then ribbed the bottom together, then sewed up the sides.

I also made two detachable straps instead of a decorative one.

DSC_0231 4 DSC_0233 2 DSC_0236

Free-handed Hat

I had never successfully completed a hat until recently. So I decided, as my next one to free hand it. Because that is brilliant. Not really, but it worked out.

I had some leftover yarn from my grandmother’s cowl, so I made it into a hat. With a POMPOM. I am very excited about it. I just cast on 96 stitches and kind of went with it. Whatever I felt like doing.

DSC_0230 DSC_0231 3 DSC_0233